Key takeaways
- The simplest workflow is a dedicated lecture recorder that captures screen, slides and webcam together and goes straight to subtitles and light editing — no separate video editor needed.
- Built-in tools (macOS Shift-Cmd-5, Windows Game Bar) record the screen but offer no live annotation, no webcam overlay, no captions and no editing.
- Annotating live — a pen, a zoom-to-focus, a spotlight — does more for comprehension than any post-production effect.
- Penbeam is a desktop record + edit + subtitle tool built for teaching (macOS 12.3+ and Windows 10+). Subtitles are generated locally and offline, so nothing is uploaded.
- There’s a free tier (10 min/session, watermark, 1080p); Pro removes the limits from $39.99/year, with an education discount.
The easiest way to record a lecture is to use one tool that does the whole job: capture your screen and voice (and your face if you want), let you draw and zoom while you talk, and then add subtitles and trim the rough bits — all without exporting your footage into a separate editor. This guide walks through that workflow end to end.
Before you hit record
A good recording is mostly decided before you press the button. Spend two minutes on these:
- Close the noise. Quit chat apps and notifications so a pop-up doesn’t land mid-recording. On Mac, turn on Do Not Disturb; on Windows, Focus Assist.
- Know your first sentence. You don’t need a script, but knowing how you’ll open kills the awkward "um, so, today…" start.
- Tidy the screen you’ll share. Hide your desktop clutter, bump the font size in slides or code, and open the tabs you’ll actually use.
- Do a 10-second mic test. Record a few seconds, play it back. Bad audio sinks a lecture faster than bad video.
What to capture: screen, slides, webcam
Most lectures are one of three shapes, and the capture setup follows:
- Slides or document walkthrough. Capture the full screen or just the slide window, plus your voice. A small webcam in the corner is optional but makes it feel like you’re in the room.
- Software / coding demo. Capture the screen, and turn on click and keystroke display so students can see exactly what you pressed. Zoom into the relevant area instead of expecting them to squint.
- Talking-to-camera explainer. Webcam-forward, with the screen as support. Good for short concept videos and course intros.
Annotate while you teach
This is the part built-in recorders miss, and it’s the part that actually helps students. Being able to draw on the screen, highlight a line, or zoom into a detail while you’re talking turns a flat screen capture into a real lesson. A circled term, an arrow to the right button, a quick zoom onto the line of code you’re explaining — these are worth more than any transition or animation you’d add in post.
Step by step: recording a lecture
With a purpose-built tool like Penbeam, the flow is short:
- Pick your sources. Choose the screen or window, toggle the webcam (corner bubble or framed), and select your mic.
- Start, with a countdown. A 3-2-1 countdown gives you a beat to settle before you’re live.
- Teach, and annotate as you go. Use the pen to mark things up, zoom in on details, show clicks and keystrokes for demos. Pause if you need to.
- Stop. You land straight in the editor with the recording ready — no importing.
Compared with the built-in macOS recorder (Shift-Cmd-5) or Windows Game Bar, you’re not just left with a raw screen capture you then have to figure out how to caption and edit elsewhere.
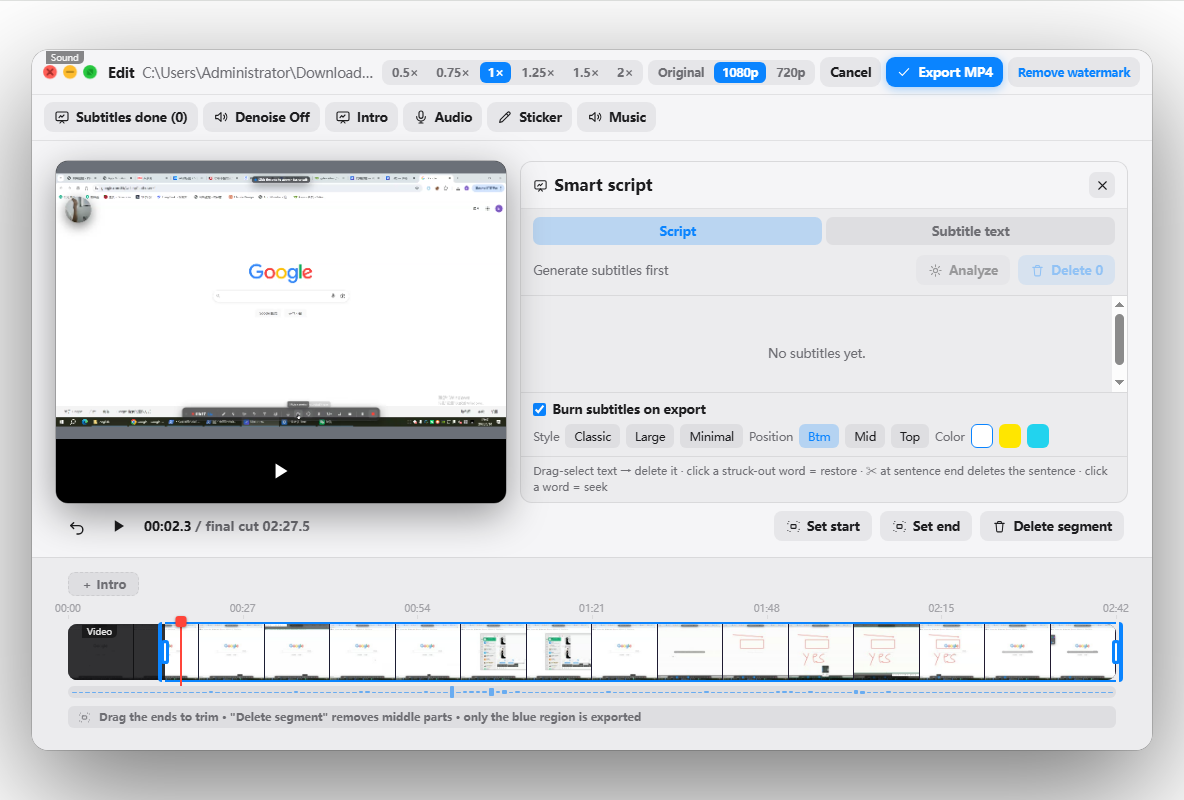
After recording: subtitles & quick edits
The finish is what makes it look professional, and it’s fast:
- Generate subtitles automatically. Penbeam transcribes locally (offline) with word-level timing, so captions are accurate and nothing is uploaded — important when content shouldn’t leave your machine.
- Cut the rough bits. Remove long silences and filler words ("um, uh") in one pass instead of scrubbing the timeline, and trim any retakes.
- Clean the audio. AI noise reduction takes out fan hum and keyboard clatter.
- Export and share. Output a finished MP4 ready for your LMS, YouTube or a file share.
Penbeam runs on macOS and Windows and is free to try, with the advanced editing and subtitle features available on Pro. See the full feature list on the features page, or grab it from lecta.cc/download.
FAQ
What is the easiest way to record a lecture?
Use a dedicated lecture recorder that captures your screen, slides and webcam together, lets you annotate while you talk, and generates subtitles afterward — so you go from recording to a finished video in one app, without exporting into a separate editor.
Do I need a webcam to record a lecture?
No. A webcam adds a personal feel and improves engagement, but it’s optional. You can record screen and voice only, or add a small picture-in-picture webcam in a corner when it helps.
How do I record a lecture on a Mac?
You can use the built-in screen recording (Shift-Cmd-5), but it only captures the screen with no annotation, editing or subtitles. A purpose-built tool like Penbeam records screen + webcam, lets you draw and zoom while teaching, and adds subtitles automatically. It runs on macOS 12.3+ and Windows 10+.
How long should a recorded lecture be?
Shorter is usually better online. Aim for 6–12 minutes per concept and split long topics into segments. Students finish short videos far more often than 40-minute ones, and short clips are easier to re-record and update.
Free download for macOS and Windows. Annotate while you talk; auto subtitles when you finish.